Showing posts with label 93 Talon TSi/AWD- Trogdor. Show all posts
Showing posts with label 93 Talon TSi/AWD- Trogdor. Show all posts
Sunday, August 28, 2022
Down The Rabbit Hole
I haven't logged into this thing in awhile, for..."reasons".
"So Where You Been Numbnuts?"
Finally moved out of my apartment and bought a house in 2019 or so. I've been getting used to being a homeowner and all the assorted BS that goes with it.
A nice big yard with plenty of trees seemed like a nice idea at the time, but then I discovered the mowing it and keeping it up was a giant PITA. Luckily it's outside the city limits, no HOA or covenants to deal with. As long as I don't get too crazy, I can keep a few extra automotive projects on hand.
After getting the Stealth, a lot of cars have darkened my garage and driveway. To Include:
95 Eagle Summit Wagon
94 Plymouth Colt Wagon (Clown Car)
87 Mitsubishi Mighty Max 2WD
08 Volvo C30 Hatch
92 Dodge Stealth R/T TT (Parts Car, Dog Chew Toy)
87 Dodge Ram 50 4x4 ("Just" had a Blown Headgasket. Lies)
13 VW Passat TDI* (Sonata Replacement)
04 BMW 325CI Convertible (Never Again..BMW Hot Garbage)
05 VW Beetle TDI 5 Speed (Leaky POS, Got Screwed)
87 Chrysler Conquest TSi (Silver, Rusty Parts Car For The Ram 50)
89 Chrysler Conquest TSi ( Wanted a Conquest Project. Got This Rusty POS)
88 Chrysler Conquest TSi (Maroon Project Car)*
89 Chrysler Conquest TSi (Blurple Parts Car)
The ones in bold and asterisked are all former Daily Drivers, Flip Cars, Failed Flips or Parts Cars.
Oh, and I also got a dog. Or rather, the dog got me. She's a amazing dog and I'm glad she found me and my GF.
So yeah, a lot of things going on since 2018.
"What About COVID?"
Oh yeah. I got screwed by that too.
Just like a lot of people all over the world. Got laid off for a few months, got called back and started working again. Worried about money the whole time, especially after buying my first house. Business hasn't returned to Pre-"Pandemic" levels, and it's still a source of worry. Decisions were made by the powers that be and I'm not sure if they were the right ones or not. Moving on now...
"New Lineup, Then?"
Yeah.. Sold my 93 Talon TSi/AWD (Trogdor) off because I just wanted to concentrate on the Stealth.
Of course I had bought a few interesting shitboxes to play with the (Colt/Summit Wagons), the Mighty Max and a 4x4 Ram 50 that "just needs a new head".
Bought a rebuilt head for the Ram 50, and discovered it had no compression and needed a new bottom end. Figures.
My buddy in Houston had a complete 87 Conquest that he was selling as a parts car. Went down, picked it up and after pulling the motor out of the Conquest for the Ram 50, I decided I really wanted a good StarQuest as a project car.
So this led to me falling down the Starion/Conquest "Rabbit Hole" big time. Bought a 89 running and driving Conquest from a buddy in Texas that turned out to be a giant, rolling Tetanus Shot.
Further inspection revealed it was far too rusty to save, so I started parting it out to recoup some money after my buddy refunded me some money for the car.
Asked around and another buddy let me know about one his boss had been holding onto for the last 10 years or so behind his garage.
It had been stored on a concrete pad the whole time and was supposed to be a rust free Texas car.
Sure. Just like the Gold one rotting in my backyard now.
88 Chrysler Conquest TSi 5 Speed in Durban Maroon. Durban Maroon was a one year only color available only on the Chrysler Conquest in the U.S. Market. So, kind of a rare car.
It actually wound up being a fairly decent car that had just been sitting for awhile. "Ran When Parked".
Interior was kind of blasted from the sun, but no big deal. The gold car had a decent interior to swap into the one.
Picked it up, brought it home and proceeded to spend the next few months cleaning it up, sorting it out and finally getting it started for the first time in over 10 years. Interior was swapped out for a black dash and other parts cars and it now runs and drives.
So that's where it's at now. It runs and drives and now, I'm just trying to get it to look better.
Between this and the Stealth, I think I've got plenty to work on and document in this blog.
Infor mation on the Starion/Conquest cars is very hard to find and a lot of past information resources have either been lost or deleted.
I plan to restore this car as best as I can and will probably wind up swapping a 4G6X motor into it, as the G54B just doesn't have the aftermarket support that the 4G6X series does.
So, hopefully this means there will be more posts and information on this and future cars.
One of the modifications was the reinstallation of the Heater Box, Blower Motor and associated Ducting under the dash. I also wanted to replace the cracked 93 Dash with one in better condition.
I picked up the parts from a 91 TSi that a mutual friend was junking back in Texas, along with a replacement Dashboard from a local junkyard.
The Dashes were swapped and the Blower Motor, Heater and Ducting were installed as well. Unfortunately, the Temperature Selector Cable wasn't installed properly, and I could never get full range of motion out of the dial.
At the time, it worked (kind of), and I really didn't feel like dicking around with possibly having to pull the Dash again if the Heater Core had to come back out, so I let it sit and resolved to fix it..."later".
Fix One Thing...
A week or so ago, I finally fixed my Fuel Gauge and had the engine running to check everything out in the cockpit of the car.
I decided to check the operation of the Blower Motor, Mode Select and Ventilation settings, and of course..
Something Broke
The Mode Select Knob got stuck in the Defrost position and wasn't blowing air out of the Defrost Vents. I couldn't get the knob to rotate back to the Vent position and of course the Temperature Selector Knob, only "Kind Of" worked. At least the Ventilation Source Knob worked just fine.
I had that at least going for me.
They Put It, Where?
After a few days of procrastination, I decided I might as well fix the stupid thing. Again.
In order to do that, a bit of the Interior needed to be removed to access the Control Cables for the Ventilation and Heating System.
It wasn't hard to remove, I was just irked because I had taken some of it apart a bit ago when I was troubleshooting my Fuel Gauge issue.
Figures.
This is what I removed:
Glovebox
Radio
D/S Knee Protector Pad
Center Console Side Panels
Ventilation Ducting On The Passenger And Driver's Side
Now, time to get after it.
Mode Select
This was a easy fix, as the Selector Cable had popped loose from the Retaining Clip securing it to the Heater Box. Without the cable secured, it couldn't move the Mode Select Lever on the Heater Box.
The Lever is located on the Driver's Side of the car, underneath the Dash. The Knee Protector Pad, and the Side Cover for the Center Console needs to be removed to access this Cable. You'll have to lay on your back and crawl under the dash to see it.
I disconnected the Cable and manually cycled the Lever on the Heater Box to confirm the Lever wasn't binding. Moving the Lever to the proper positions manually, had air from the Blower Motor going to the proper vents.
The Cable End was reinstalled and secured in the Retaining Clip after consulting the FSM to ensure it was adjusted correctly.
It's Getting Hot In Here
The Temperature Selector Lever is located on the Passenger Side of the car, directly behind the Radio. Removing the Radio, Glovebox and the Side Panel for the Center Console makes this easier to access than the Mode Selector Lever.
The Cable End and the Cable itself was still secured properly, and working (kind of), so I checked the FSM for the adjustment procedure.
It turns out the Cable was improperly adjusted and just needed to be reinstalled correctly.
Why Not?
I also checked the Ventilation Source Cable and verified adjustment, since it was easy to reach due to the Glovebox being removed already.
Adjustments
Per The 93 Factory Service Manual:
Temperature Control
Set Temperature Knob to "HOT" (Full Clockwise)
Lever On Heater Box, Pressed Completely "DOWN"
Secure Rod End And Cable In These Positions
Mode Select
Set Mode Knob to "Defrost" (Full Clockwise)
Lever On Heater Box, Pressed "FORWARD" Towards The Firewall
Secure Rod End and Cable In These Positions
Ventilation Source
Set Air Select Knob to "RECIRCULATE"
Lever On Air Duct, Pressed Completely Against The Stopper
Secure Rod End And Cable In These Positions
Now, if only I still had A/C in this stupid thing.
"What do you want me to do Mix?" "Push freak! Push!" -Sir MixaLot
I Think I've Got Enough...Hopefully.
This is something I said a few times while driving "Trogdor" to get tagged and titled last year.
The Fuel Gauge had never worked since I got the car back in early 2017. My buddy said it worked for him, when he had it, but the car had sat for a few years, so who knew what was going on with it?
Bad wiring? Faulty Sending Unit? Bad Gauge? Who knew? I know I didn't have any idea.
I DESPISEtroubleshooting Electrical Problems, especially ones that could involve tracing wiring down. So, I let it slide for the most part. Eventually, I made a half assed attempt at fixing the problem, by taking the old "Troubleshooting Shotgun" and threw some parts at it.
Round 1....Fight!
The car had left me stranded on the way back from the registration trip due to Bad Gas in the tank and a thoroughly grungy, and nasty looking Walbro Fuel Pump and Filter Sock.
So in typical DSM Fashion, Trogdor was brought home on a flatbed trailer from it's maiden voyage under my ownership. Not a good way to start things.
Just Chilling For Two Hours, Waiting For A Tow
To ensure this didn't happen again. I drained the tank, and added some Marvel Mystery Oil to the tank along with fresh fuel. The car ran great and made it to Cars And Coffee the next morning without a hitch. No one paid any attention to it, but I was stoked.
I Made It!!
Nobody Cares!
In order to avoid another encounter with a Flatbed, I decided to replace the existing Fuel Pump and Fuel Filter. I had already bought a used Fuel Level Sending Unit, because like I said, throwing parts at something without actually troubleshooting the issue ALWAYS works.
60% of the time.
Swapped out the pump with another Walbro 255 lph HP from Auto Performance Engineering in Texas. I've bought pumps from him for years and he only sells Genuine Walbro Pumps and Install Kits. Go see him for your Fuel Pump needs. A great guy to deal with.
The Fuel Level Sending Unit was swapped out at that time with one that checked good with a multimeter. The one that was in the car when I bought it, didn't read correctly on the meter.
Per the FSM: Full-Approx 1-5 Ohms, Empty- 103-117 Ohms.
Put everything back in, and started the car to check for leaks. No leaks...and no change in the Fuel Level Gauge.
*FML* The Troubleshooting Shotgun has failed me. Again.
I decided to try and fix it later, when I had time.
A Funny Thing Happened On The Way Home...
"Later" never really happened, because of a slight accident back in September of last year. I had other things on my mind, besides my cars and I was pretty busy just trying to get back on my feet.
I eventually did get back on my feet, and I resolved to finally try and really figure this issue with the car out. It wasn't a life or death type issue, it just made my OCD flare up because the stupid gauge continued to defy me by displaying "E" all the time.
It was mocking me, and I wasn't going to stand...or sit for it.
It's Go Time..
Stop Mocking Me!
I cracked open the Factory Service Manual and started troubleshooting with the easy stuff first.
Continuity- I checked to see if the circuit from the Fuel Pump Connector to the Connector in the Dash for the Gauge Cluster was complete.
Using some wire, jumper leads and my multimeter I checked the path from Connector E-30 (Fuel Pump Connector) to C-65 (Under Dash/Body Harness). This checked good.
From C-65 to D-05 (R/H Side Dash/Gauge Cluster) showed good as well. I also checked continuity from the Gauge itself to the Ribbon Connector on the back of the Gauge Assembly. It was good as well.
The resistance in the path from E-30 to D-05 was approximately 3.3 Ohms. I was told that anything over 1 Ohm was suspect. I had a mishmash of wires, leads and probes to check the circuit, so I couldn't get a clean resistance reading.
My main concern was that a path existed from the Fuel Pump Connector to the Dash, which I had confirmed.
Time to move on to the next step.
Resistance- I checked the resistance reading from the Fuel Level Sending Unit again. It read approximately 10 Ohms, and I knew that the tank was still fairly full from before the accident. This seemed to indicate that the Sending Unit was still good, since it should read around 10 Ohms with a mostly full tank.
I checked the resistance on the Fuel Level Gauge in the cluster as well using info from the FSM. It passed all checks, except for a reading between the A-B Terminals. It read approximately 20 Ohms lower than what it should.
Per the FSM, the next step was to replace the gauge with a new one. I had one spare Gauge Cluster and I installed it in the car to test the Gauge. It didn't work, and I was worried about the Fuel Level Sending Unit being bad after all.
Let's Try This Again
I put an ad out on a local Facebook group, and someone in town said they had a spare 91+ DSM Gauge Cluster For Sale. I swung by and picked it up from the guy and hoped for the best.
I Hope This Works
Plugged the new Gauge Cluster in and.....
SUCCESS!
The used Gauge Cluster worked as it should. No mockery present.
I swapped the Fuel Level Gauge from that cluster to the one that came in my car and checked it again.
No issues, works like a charm.
Mock me, will you? Hah!!
Did I Learn Anything?
Yes. I still hate troubleshooting Electrical Issues.
But, if properly applied, using logical steps to troubleshoot issues with the proper information and tools, you can eventually diagnose and rectify a number of issues without "throwing parts at it."
And it probably won't take you almost a year to fix something either.
A few weeks back, I "attempted" to install a cleaner set of Taillights and Center Bezel on my 93 Talon. It didn't go so well.
I cracked the Reflective Panel of the Center Bezel, ruining what was at the time, a fairly clean and defect free piece. Not so much now, unfortunately.
I couldn't find another Center Garnish, clean or otherwise, so I decided to try and do something with the one I pulled off the car.
The scratched, dirty and rusty one? Oh yeah, this will be....fun
At Least It's Not Cracked..
It's A Little Rough
This thing has definitely seen better days. The Reflector Lens is fairly scratched, dull and worn. The black plastic Surround where the License Plate sits is faded as are the black plastic Pods under the Reverse Lamps.
It's Worse..
The rear Support Frame is made out of metal and is pretty rusty in some spots, and overall just very dirty.
The Support Frame is plastic welded to some tabs on the rear of the Reflector Lens. It's also bolted to the Reflector in two places where the License Plate sits.
The Plastic Welds are very fragile and have a tendency to separate from the metal Frame as time goes on. Automotive Goop seems to work well to repair these connections when used sparingly.
Repair 1
Repair 2
Tear It Down
The entire Center Taillight Bezel Assembly is made up of several different components and is overall, a bit fragile due to it's construction and age.
Use Caution When Taking This Assembly Apart!
1. Remove The License Plate Lights- The two Lights for the License Plate are secured to the Metal Support Frame by a total of 4 very small Phillips Head Machine Screws. The threads on my screws were corroded, so a application of Liquid Wrench or Kroil was needed to remove them. Be sure to use the correct size Screwdriver. It's very easy to strip these fasteners out.
There They Are
2. Remove The Reverse Light/Pods- There are two Reverse Light "Pods" screwed into the Garnish Assembly with a total of 8 Fasteners for the two Pods. There is a small plastic "Trim Cover" located on the Inboard Side of both Lights. This can be removed from the rear by pushing then out from behind, with your fingers, or by using a small Flat Tip Screwdriver to pop the covers off.
Screw Covers Removed
With the covers removed you will see two large Phillips Head Screws. Remove these carefully. They're screwed into ABS Plastic, so they could be brittle enough to crack.
The Reverse Lights are also retained by screws that are on the Outboard side of both Light Assemblies.
Sneaky
The easiest way to remove the lights was to use Penetrating Oil on the Metal Screws and CAREFULLY loosen them from the housings, using the proper sized Phillips Head Screwdriver.
You should now be able to maneuver the Reverse Lights out of the Main Assembly.
This may or may not be the actual way to remove them, but it is what worked for me.
Your results may vary.
3. Wiring- Remove the Bulbs/Plugs from the various Lights in the Panel. The Wiring Harness is secured to the Metal Support Frame with Push Through Wire Clip. You should be able to use your fingers to push the Clip out without cutting it. Or cut it if you need to. It's probably overkill anyway.
No Cuts
4. Cleaning- I rinsed everything off in the tub, because I'm in a apartment, and that's all I had available. If you're lucky enough to be in a house with a water hose, get after it then. I wanted to remove as much loose dirt, trash or other debris from the parts, before the next step.
Cleaning/Polishing/Masking Supplies
5. Polishing- The Main Lens of the Bezel was pretty scratched up and dull looking. I used some Sandpaper to prep the surface before I started polishing. Starting with 800 Grit and progressing to 1000, 1500, and finally 2000 grit, the entire Reflector Lens was wet sanded to try and knock out the scratches and cuffs present on the lens.
After wiping down the sanded areas with a clean cloth, the prepped surface was polished using a Headlight Restoration Kit from Mother's . Follow the directions on the box, and you should see some great results. I also polished the Reverse Light Lenses as well.
6. Masking- The Main Reflector and the Reverse Light Assemblies were masked off to be repainted. I opted for a Semi Gloss Enamel to try and freshen up the faded areas on the Rear Bezel.
Reverse Masked
Main Bezel Assembly
Curves Suck
7. Painting- I should have taken a bit more care with this step, and gotten better results. Everything turned out OK, but if I had invested a bit more time in the process it, would have turned out a lot better.
I gave the areas to be painted a cursory pass with the 1000 Grit Sandpaper. Cleaned the affected areas and then applied the first coat of the Rustoleum Black Semi Gloss Acrylic Enamel Paint. What I should have done was use a primer coat and then, applied the paint.
After adding a few more coats, I allowed it to dry overnight. The paint on the Reverse Light Pods, ran in a few places and generally looked like ass. I tried to wet sand the Light Pods and the Screw Covers, applied a few more coats of paint and allowed them to dry again.
Once the paint was dry, I again Wet Sanded the Reverse Light Pods, Screw Covers and the Black Area for the License Plate on the Main Bezel. Using a Cordless Drill and some Polish from the Headlight Restoration Kit, I buffed the painted areas slightly. This brought out a bit of a shine to the painted areas and also removed some of the imperfections.
Slightly Polished Bezel
Wet Sanding To Try To Remove Paint Runs
In the future, if I have to do something like this again, I will take more time to do the job properly. This way worked, but it could have been done a lot easier and looked better.
Reassembly
Don't Eat These Pods Kids
Looks Better
Once everything was Painted, Cleaned and Polished, I went ahead and reassembled everything. The Reverse Light Pods were reattached, along with the License Plate Lights and Wiring Harness.
Back Together
The Weather Strip on the edge of the Bezel was reattached with some Goop and Painters Tape.
Remembering the fiasco from a few weeks ago, I wanted to ensure the installation went better this time.
I removed the Rear Hatch Trim Cover and exposed the hardware for Removing and Installing the Center Taillight Bezel. A total of 7 small 10mm Nuts need to be removed from the Mounting Studs on the back of the Center Taillight Bezel. Once these are removed, the piece can be carefully removed by pushing on the studs.
Interior Trim Panel Removed
A Total of 7 10mm Nuts Hold The Center Taillight Bezel.
The Bezel was carefully removed and placed aside. The refinished Bezel was placed on the car with the Studs aligned with the mounting holes. The wiring harness was plugged in as well.
Using some GENTLE pressure, the Bezel was pushed into place and held in place while the Nuts were started on the studs. The Nuts were tightened down slowly a bit at a time until they bottomed out. It's in and I didn't crack the stupid thing this time.
Go Me.
Uncracked...This Time.
A Little Polish
The Left and Right Taillights were in very good shape, but had some spots that needed to be addressed.
There was a small dried blob of Contact Cement on the Right Taillight and several small Blotches from what looked like Spray Paint on the Left Taillight. Some light wet sanding with 2000 Grit Sandpaper took care of the Paint Splotches, and some Goo Gone and a Razor Blade took care of the dried Glue on the right.
Both Taillights and the Center Bezel were wiped down with a wet rag and the polish from the Headlight Restoration Kit was used with the Cordless Drill to clean everything up. After a quick wipedown with a Microfiber Cloth, and a check of the Lights, this job was finished.
It's Not Perfect, But It's A Lot Better
Finished
That Was A Lot Of Work
Unfortunately the supply of Talon specific parts for this platform is dwindling as time goes on. These were popular cars at one point, but a lot of them were abused and junked over the years.
In order to keep these things looking decent, sometimes you're going to go the extra mile and do more work than the average enthusiast.
Part of the price for driving, modifying and maintaining something old and unique.
*My Cell Phone ate pretty much any pictures that weren't stored on my Phone's internal memory when my SD Card shit the bed. So, some sections don't have pictures or are whatever I managed to recover from Facebook.*
I finally got my new project car up to Wichita from it's previous home in Plano, TX.
"Trogdor" is a 1993 Eagle Talon TSi/AWD with a rather well known history to me. A buddy of mine back home, had owned the car for many years and eventually decided to sell it to me when I got tired of my Miata.
I didn't pick the name, but it kind of made me laugh all those years ago when it was first christened, so I've decided to keep it. Even if a lot of people have NO IDEA where the name came from.
It was a modified Street Car, that was modified like most AWD DSM's, in the interest of just going fast in a straight line. A bigger turbo, bigger exhaust, more fuel, more boost, screaming AWD launches from a dig. You get the idea.
After a few years, the previous owner wanted to turn it into more of a "Race Car" after he caught the "Road Racing Bug".
This led to several modifications that made safely and comfortably driving the car on the street , a little..."problematic".
Oh Boy...
Here's a partial list of the "Because Racecar" stuff was done to the car:
Welded Rollbar With Integrated Harness Bar
Stripped Interior From Behind The Front Seats Back To The Hatch
Removed Factory Seat Belts For Five Point Racing Harnesses
No Front Crash Beam Under The Bumper Cover
Corbeau Fixed Back Racing Seats
Removed Heater Core, Blower Motor, A/C Evaporator and Ducting From The Dash
Modified Engine Main Coolant Pipe With Deleted Heater Hose Fittings
Modified A/C Control Panel For Boost Gauge Install
Custom 3 Inch Thick Griffin Radiator With Slimline Fans (Needed To Be Wired Up)
Relocated Alternator to A/C Compressor Location On Engine Block
Deleted The Entire ABS System (Pump, Lines, Controller, Wiring)
Removed Factory Battery For A Lightweight Racing Battery
Brake Master Cylinder Brace
Some of the changes made were no real big deal and didn't affect the operation of the car on the street for the most part. Other changes, however did produce some issues with safety, comfort and appearance. Since I wanted something I could drive on the street and occasionally take to a race track and not the other way around, some changes were going to have to be made.
Crash Beam Blues
The first and easiest thing to address was the lack of a Crash Beam under the front bumper cover.
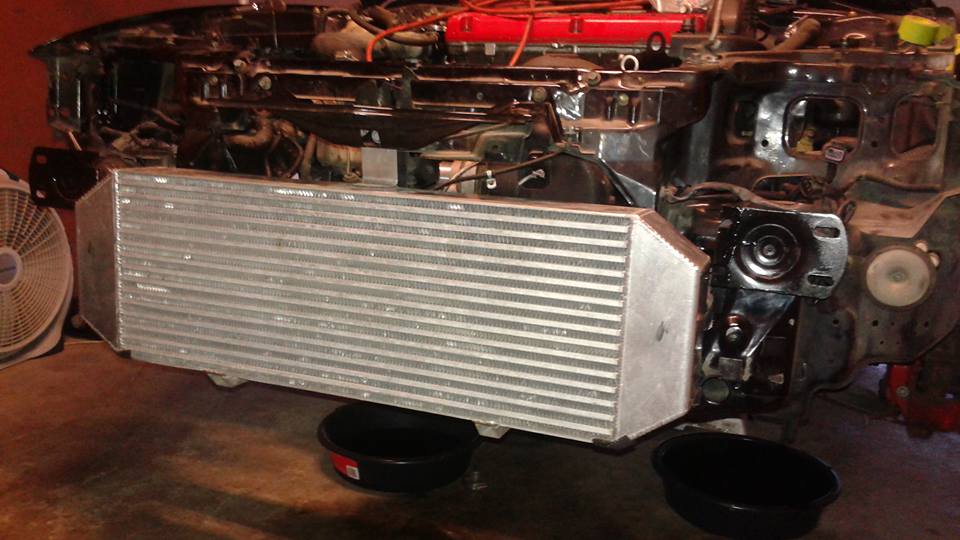
The car had a large Indy Race Core Front Mount Intercooler kit from it's days as a Dragstrip Queen.
The large Spearco core that was the centerpiece of the kit, required trimming of the Crash Beam and several other permanent modifications to properly fit on the car.
For some people, trimming the Crash Beam was a tedious and thankless task, so some opted to delete it all together. Others opted for the "Race Bumper" available from JM Fabrications. It bolts into place of the factory unit and it's made out of aluminum. It offers no protection whatsoever, but it will hold your bumper cover up and weighs next to nothing.
I know that a factory Crash Beam that's been cut and trimmed to fit a large Intercooler Core is not going to be anywhere near as strong as it used to be. However, I would personally take my chances with a compromised Crash Beam in place, rather than nothing at all on the street.
I found a local guy willing to sell me a front Crash Beam from his 93 Eclipse along with the hydraulic shock mounts for the bumper. I then proceeded to cut and modify the components to allow the Intercooler to clear and added a little peace of mind, if not some additional protection to myself and the car.
Friends Indeed
A mutual friend of both myself and the previous owner was looking to get rid of one of his DSM's back in Texas. I was basically told that if I wanted it, I could have his old 91 Eagle Talon TSi/FWD.
If I wasn't interested, he was going to crush the car because it had been sitting at his Mom's house for over 8 years and needed to go.
I made the trip back down there with the possibility of hauling the whole thing back up to Wichita as a possible car for my Girlfriend. Unfortunately, the car was too far gone and I decided to pass on taking it home.
I was then given the opportunity to take whatever I wanted from the car, and I wound up stripping the complete interior from the car, minus the cracked dash and anything I already had in my 93.
I hated basically adding the final nail to this car's coffin, but needs outweigh want.
I went back to Wichita with a bunch of sun faded interior parts, that would help me resurrect my 93's interior.
Dashboard Refresh
The original Dashboard in the 93 was cracked in the center, much like the 91 parts car in Texas. Also the soft touch "Elephant Hide" padding used on the dash had started to delaminate and curl up from the heat in some spots. Unfortunately this is a common issue with the First Generation DSM's.
I decided to find another Dashboard Assembly and swap it in. Since the dash would be out, it was also a good time to go ahead and address the Heater Core, Ducting and Blower Motor under the dash.
I found a decent used dash from a 90 AWD in a local junkyard using car-part.com. I used it to search for junkyards in the area that had a Dashboard and lucked out with a yard here in town.
I had never pulled a Dashboard out from a 1G DSM, so I had to do a little research. I found a great video on YouTube from "Velocity Labs" that detailed how to go about this.
With a minimum of cursing, and dropped bolts I managed to get everything out by myself. I had to swap dash harnesses from the 93 Dash into the replacement 90 Dash because of some gauge cluster wiring differences, but it wasn't hard.
I also took the time to remove the padded "Elephant Hide" from the dash and used Automotive Goop and some spring clamps to try and fix the peeling issue. It's not perfect, but it looks a lot better now.
However, before the dash could go back in...I needed to work on the Heater, Blower and Ducting first.
I managed to snag everything I needed to reinstall heat and ventilation back into the 93 from the 91 Texas parts car. I ordered a new Heater Core from Autozone and swapped it into the housing.
I gutted the A/C Evaporator case and installed a metal blank off plate where the evaporator lines poked through the firewall. I also took the time to clean out the blower motor with compressed air.
The under dash heating and ventilation components were reinstalled, along with the un-cracked dash. The 90 Dashboard is a slightly lighter shade of grey than the 93, but it isn't a real issue as it looks great without a huge crack down the center.
Take Your Seats, Seat Belts....Whatever
I liked the Corbeau Racing Seats, but didn't want to deal with getting into a 5 Point Racing Harness everytime I got into the car. Also the Harnesses while cool as Hell, weren't technically street legal. So, unfortunately for now, the factory Seats and Seat Belts would have to go back in.
The Corbeau seats unbolted from the car just like the factory units, since they used vehicle specific brackets to bolt into the car. I had a set of grey factory seats from the Texas car, but needed to address the Seat Belts before throwing them into the car.
The factory Automatic Front Seat Belts had been removed when the 5 Point Harnesses went in. I had the parts from the 91 to throw into the car, so I started bolting everything up. It was going so well too...until I realized some of the wiring for the passenger side Seat Belt Was missing.
If you remember the ABS had been deleted from the car by the previous owner. He had also taken the time to delete the wiring for the ABS system in the car, which unfortunately also contained the factory Seat Belt wiring on the passenger side.
*CRAP IN A HAT*
There was brief experiment where I tried to install a set of 2G DSM Seat Belts into the car, and I even thought about trying to track down a set of Canadian 1G Seat Belts. Too hard to find Canadian Belts and the 2G Belts looked like ass in the car. Plus I was concerned witht heir ability to keep me safe. I decided to "Bite The Bullet."
I asked my friend back in Texas to send me the entire Interior Body Harness from the 91 to me so I could maybe, "cludge" the wiring I needed back into the car. Using the Factory Service Manuals, a Multimeter, a lot of cursing and trying to wrap my head around the Factory Wiring Diagrams, I eventually got everything figured out and rewired.
With the Seat Belt Wiring sorted out, I needed to clear up some other interior issues before the belts could be completely reinstalled. I was relieved though, because I knew it all worked and the car was closer to being a Street Car again.
Interior Makeover
Since I wasn't a fan of the Stripped Interior, I wanted it to have most of the interior reinstalled. Luckily the 91 Texas Talon had given up it's very complete, but rather sunfaded interior.
The seats were in excellent shape, just faded. I used some Upholstery/Seat Cleaner on it with my Shop Vac and made the front and rear seats presentable again.
The interior panels were cleaned with water and a damp rag to get the panels as clean as possible. Since they were faded, I wanted to do something to make them look better.
I found some Vinyl/Fabric Coating from Dupli Color in the local Autozone and decided to give it a shot. I bought the recommended Adhesion Promoter and looked for something that would work for my panels.
Unfortunately the closest color that matched was either Charcoal Grey or Black. Easy choice there, I went with Grey.
Followed the directions on the can, and it turned out okay. I have no idea on how durable the finish will be, but it looks a lot better. Even if the Grey is a lighter shade than the factory color.
Now that the panels were ready, I needed a way to attach them. The Interior Trim pieces are held in place by a combination of Nylon Trim Plugs, Screws, Double Sided Tape and Good Intentions.
Most of the Snap/Pop Fasteners used were no longer available from the dealership, having been long out of production for the most part.
Using a cracked version of CAPS, the Mitsubishi Parts Lookup Software, I was able to get the part numbers for a number of the fasteners and was able to track down whatever I couldn't get from the dealership via Amazon or E-Bay.
Now, hopefully I could get the Interior Panels reinstalled around the Roll Bar.
That's A Nice Roll Bar...It'd Be A Shame...
I REALLY wanted to keep the Roll Bar in the car.
I tried, I really tried to keep it but I think I knew early on, it was probably going to have to come out of the car.
First there were the Gussets that tied the main hoop to the B-Pillars of the car. I was willing to trim the B-Pillar Trim Panels if I could get the panels to fit around the Main Hoop and Gussets.
I couldn't do it with the Gussets in place, so I removed them with a Angle Grinder and a Sawz All.
That truly sucked to do because I nearly set the headliner on fire, and metal shards got everywhere in the car. But with the Gussets gone I was able to reinstall the Front Seat Belt Tracks on botrh sides and the B-Pillar Trim Panels. Success!! (Or So I Thought)
Unfortunately the Lap Belt Reels for the Front Seat Belts are what finally killed the Roll Bar. The base for the Main Hoop was welded in place on the floor, directly in the way of the opening where the reels for the Front Lap Belts needed to go.
I could keep the Roll Bar, but I would need to use the 5 Point Racing Harnesses...everywhere.
I would also not be able to reinstall the Rear Seats, some Interior Panels would require trimming to clear the Main Hoop, and all the time and effort spent in rewiring the Seat Belt on the Passenger Side?
WASTED!
Screw It. It's coming out.
Grabbed my Sawz All and did the dirty deed. I wasn't happy about it, but it was just in the way. One day, I'd like to put another one in that's more interior friendly. Maybe an Autopower Bolt In Cage. I don't know.
I kept the Cross Bar tying the rear strut towers together, because it was already there and figured it couldn't hurt to keep it in place. It required trimming the Rear Hatch Trim to clear the Cross Bar, but it doesn't look that bad.
With that issue addressed, the rest of the interior went back together rather easily. Everything that's supposed to work interior wise, works. For the most part.
I left the Rear Seat Belts out of the car since no one is insane enough to ride in the back of a 1G DSM, unless they're into pain or something. The Rear Seats are there purely for decoration, as a barrier to separate the Rear Hatch from the Passenger Compartment and Sound Deadening.
The Heater and Blower Motor work as advertised, although I can't get full travel out of the Temperature Select Knob. I'll have to mess with it later.
Seat Belts work as advertised and they had better after all the BS I went through to reinstall them and losing the Roll Bar.
The seats and refinished trim pieces look great and make the car look almost like a real car again.