
Well, Let's Get On With It

*My Cell Phone ate pretty much any pictures that weren't stored on my Phone's internal memory when my SD Card shit the bed. So, some sections don't have pictures or are whatever I managed to recover from Facebook.*
I finally got my new project car up to Wichita from it's previous home in Plano, TX.
I finally got my new project car up to Wichita from it's previous home in Plano, TX.
"Trogdor" is a 1993 Eagle Talon TSi/AWD with a rather well known history to me. A buddy of mine back home, had owned the car for many years and eventually decided to sell it to me when I got tired of my Miata.
I didn't pick the name, but it kind of made me laugh all those years ago when it was first christened, so I've decided to keep it. Even if a lot of people have NO IDEA where the name came from.
It was a modified Street Car, that was modified like most AWD DSM's, in the interest of just going fast in a straight line. A bigger turbo, bigger exhaust, more fuel, more boost, screaming AWD launches from a dig. You get the idea.
After a few years, the previous owner wanted to turn it into more of a "Race Car" after he caught the "Road Racing Bug".
This led to several modifications that made safely and comfortably driving the car on the street , a little..."problematic".
Oh Boy...
Here's a partial list of the "Because Racecar" stuff was done to the car:
- Welded Rollbar With Integrated Harness Bar
- Stripped Interior From Behind The Front Seats Back To The Hatch
- Removed Factory Seat Belts For Five Point Racing Harnesses
- No Front Crash Beam Under The Bumper Cover
- Corbeau Fixed Back Racing Seats
- Removed Heater Core, Blower Motor, A/C Evaporator and Ducting From The Dash
- Modified Engine Main Coolant Pipe With Deleted Heater Hose Fittings
- Modified A/C Control Panel For Boost Gauge Install
- Custom 3 Inch Thick Griffin Radiator With Slimline Fans (Needed To Be Wired Up)
- Relocated Alternator to A/C Compressor Location On Engine Block
- Deleted The Entire ABS System (Pump, Lines, Controller, Wiring)
- Removed Factory Battery For A Lightweight Racing Battery
- Brake Master Cylinder Brace


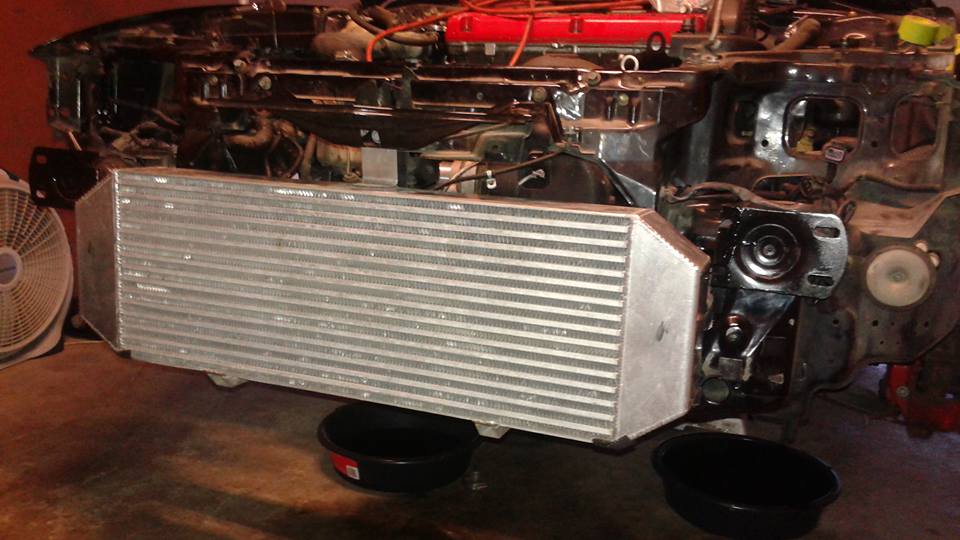
Crash Beam Blues
The first and easiest thing to address was the lack of a Crash Beam under the front bumper cover.
The car had a large Indy Race Core Front Mount Intercooler kit from it's days as a Dragstrip Queen.
The large Spearco core that was the centerpiece of the kit, required trimming of the Crash Beam and several other permanent modifications to properly fit on the car.
For some people, trimming the Crash Beam was a tedious and thankless task, so some opted to delete it all together. Others opted for the "Race Bumper" available from JM Fabrications. It bolts into place of the factory unit and it's made out of aluminum. It offers no protection whatsoever, but it will hold your bumper cover up and weighs next to nothing.

I know that a factory Crash Beam that's been cut and trimmed to fit a large Intercooler Core is not going to be anywhere near as strong as it used to be. However, I would personally take my chances with a compromised Crash Beam in place, rather than nothing at all on the street.
I found a local guy willing to sell me a front Crash Beam from his 93 Eclipse along with the hydraulic shock mounts for the bumper. I then proceeded to cut and modify the components to allow the Intercooler to clear and added a little peace of mind, if not some additional protection to myself and the car.


Friends Indeed
A mutual friend of both myself and the previous owner was looking to get rid of one of his DSM's back in Texas. I was basically told that if I wanted it, I could have his old 91 Eagle Talon TSi/FWD.
If I wasn't interested, he was going to crush the car because it had been sitting at his Mom's house for over 8 years and needed to go.
I made the trip back down there with the possibility of hauling the whole thing back up to Wichita as a possible car for my Girlfriend. Unfortunately, the car was too far gone and I decided to pass on taking it home.
I was then given the opportunity to take whatever I wanted from the car, and I wound up stripping the complete interior from the car, minus the cracked dash and anything I already had in my 93.
I hated basically adding the final nail to this car's coffin, but needs outweigh want.
I went back to Wichita with a bunch of sun faded interior parts, that would help me resurrect my 93's interior.
Dashboard Refresh
The original Dashboard in the 93 was cracked in the center, much like the 91 parts car in Texas. Also the soft touch "Elephant Hide" padding used on the dash had started to delaminate and curl up from the heat in some spots. Unfortunately this is a common issue with the First Generation DSM's.
I decided to find another Dashboard Assembly and swap it in. Since the dash would be out, it was also a good time to go ahead and address the Heater Core, Ducting and Blower Motor under the dash.
I found a decent used dash from a 90 AWD in a local junkyard using car-part.com. I used it to search for junkyards in the area that had a Dashboard and lucked out with a yard here in town.
I had never pulled a Dashboard out from a 1G DSM, so I had to do a little research. I found a great video on YouTube from "Velocity Labs" that detailed how to go about this.
With a minimum of cursing, and dropped bolts I managed to get everything out by myself. I had to swap dash harnesses from the 93 Dash into the replacement 90 Dash because of some gauge cluster wiring differences, but it wasn't hard.
I also took the time to remove the padded "Elephant Hide" from the dash and used Automotive Goop and some spring clamps to try and fix the peeling issue. It's not perfect, but it looks a lot better now.
However, before the dash could go back in...I needed to work on the Heater, Blower and Ducting first.
I managed to snag everything I needed to reinstall heat and ventilation back into the 93 from the 91 Texas parts car. I ordered a new Heater Core from Autozone and swapped it into the housing.
I gutted the A/C Evaporator case and installed a metal blank off plate where the evaporator lines poked through the firewall. I also took the time to clean out the blower motor with compressed air.
The under dash heating and ventilation components were reinstalled, along with the un-cracked dash. The 90 Dashboard is a slightly lighter shade of grey than the 93, but it isn't a real issue as it looks great without a huge crack down the center.
Take Your Seats, Seat Belts....Whatever
I liked the Corbeau Racing Seats, but didn't want to deal with getting into a 5 Point Racing Harness everytime I got into the car. Also the Harnesses while cool as Hell, weren't technically street legal. So, unfortunately for now, the factory Seats and Seat Belts would have to go back in.
The Corbeau seats unbolted from the car just like the factory units, since they used vehicle specific brackets to bolt into the car. I had a set of grey factory seats from the Texas car, but needed to address the Seat Belts before throwing them into the car.
The factory Automatic Front Seat Belts had been removed when the 5 Point Harnesses went in. I had the parts from the 91 to throw into the car, so I started bolting everything up. It was going so well too...until I realized some of the wiring for the passenger side Seat Belt Was missing.
If you remember the ABS had been deleted from the car by the previous owner. He had also taken the time to delete the wiring for the ABS system in the car, which unfortunately also contained the factory Seat Belt wiring on the passenger side.
*CRAP IN A HAT*
There was brief experiment where I tried to install a set of 2G DSM Seat Belts into the car, and I even thought about trying to track down a set of Canadian 1G Seat Belts. Too hard to find Canadian Belts and the 2G Belts looked like ass in the car. Plus I was concerned witht heir ability to keep me safe. I decided to "Bite The Bullet."
I asked my friend back in Texas to send me the entire Interior Body Harness from the 91 to me so I could maybe, "cludge" the wiring I needed back into the car. Using the Factory Service Manuals, a Multimeter, a lot of cursing and trying to wrap my head around the Factory Wiring Diagrams, I eventually got everything figured out and rewired.
I asked my friend back in Texas to send me the entire Interior Body Harness from the 91 to me so I could maybe, "cludge" the wiring I needed back into the car. Using the Factory Service Manuals, a Multimeter, a lot of cursing and trying to wrap my head around the Factory Wiring Diagrams, I eventually got everything figured out and rewired.
With the Seat Belt Wiring sorted out, I needed to clear up some other interior issues before the belts could be completely reinstalled. I was relieved though, because I knew it all worked and the car was closer to being a Street Car again.
Interior Makeover
Since I wasn't a fan of the Stripped Interior, I wanted it to have most of the interior reinstalled. Luckily the 91 Texas Talon had given up it's very complete, but rather sunfaded interior.
The seats were in excellent shape, just faded. I used some Upholstery/Seat Cleaner on it with my Shop Vac and made the front and rear seats presentable again.
The interior panels were cleaned with water and a damp rag to get the panels as clean as possible. Since they were faded, I wanted to do something to make them look better.
I found some Vinyl/Fabric Coating from Dupli Color in the local Autozone and decided to give it a shot. I bought the recommended Adhesion Promoter and looked for something that would work for my panels.
Unfortunately the closest color that matched was either Charcoal Grey or Black. Easy choice there, I went with Grey.
Followed the directions on the can, and it turned out okay. I have no idea on how durable the finish will be, but it looks a lot better. Even if the Grey is a lighter shade than the factory color.


Now that the panels were ready, I needed a way to attach them. The Interior Trim pieces are held in place by a combination of Nylon Trim Plugs, Screws, Double Sided Tape and Good Intentions.
Most of the Snap/Pop Fasteners used were no longer available from the dealership, having been long out of production for the most part.
Using a cracked version of CAPS, the Mitsubishi Parts Lookup Software, I was able to get the part numbers for a number of the fasteners and was able to track down whatever I couldn't get from the dealership via Amazon or E-Bay.
Now, hopefully I could get the Interior Panels reinstalled around the Roll Bar.
That's A Nice Roll Bar...It'd Be A Shame...
I REALLY wanted to keep the Roll Bar in the car.
I tried, I really tried to keep it but I think I knew early on, it was probably going to have to come out of the car.
First there were the Gussets that tied the main hoop to the B-Pillars of the car. I was willing to trim the B-Pillar Trim Panels if I could get the panels to fit around the Main Hoop and Gussets.

I couldn't do it with the Gussets in place, so I removed them with a Angle Grinder and a Sawz All.
That truly sucked to do because I nearly set the headliner on fire, and metal shards got everywhere in the car. But with the Gussets gone I was able to reinstall the Front Seat Belt Tracks on botrh sides and the B-Pillar Trim Panels. Success!! (Or So I Thought)
Unfortunately the Lap Belt Reels for the Front Seat Belts are what finally killed the Roll Bar. The base for the Main Hoop was welded in place on the floor, directly in the way of the opening where the reels for the Front Lap Belts needed to go.
I could keep the Roll Bar, but I would need to use the 5 Point Racing Harnesses...everywhere.
I would also not be able to reinstall the Rear Seats, some Interior Panels would require trimming to clear the Main Hoop, and all the time and effort spent in rewiring the Seat Belt on the Passenger Side?
I would also not be able to reinstall the Rear Seats, some Interior Panels would require trimming to clear the Main Hoop, and all the time and effort spent in rewiring the Seat Belt on the Passenger Side?
WASTED!
Screw It. It's coming out.
Grabbed my Sawz All and did the dirty deed. I wasn't happy about it, but it was just in the way. One day, I'd like to put another one in that's more interior friendly. Maybe an Autopower Bolt In Cage. I don't know.
Grabbed my Sawz All and did the dirty deed. I wasn't happy about it, but it was just in the way. One day, I'd like to put another one in that's more interior friendly. Maybe an Autopower Bolt In Cage. I don't know.
I kept the Cross Bar tying the rear strut towers together, because it was already there and figured it couldn't hurt to keep it in place. It required trimming the Rear Hatch Trim to clear the Cross Bar, but it doesn't look that bad.


With that issue addressed, the rest of the interior went back together rather easily. Everything that's supposed to work interior wise, works. For the most part.
I left the Rear Seat Belts out of the car since no one is insane enough to ride in the back of a 1G DSM, unless they're into pain or something. The Rear Seats are there purely for decoration, as a barrier to separate the Rear Hatch from the Passenger Compartment and Sound Deadening.
The Heater and Blower Motor work as advertised, although I can't get full travel out of the Temperature Select Knob. I'll have to mess with it later.
Seat Belts work as advertised and they had better after all the BS I went through to reinstall them and losing the Roll Bar.
The seats and refinished trim pieces look great and make the car look almost like a real car again.
I just wish I had some pics so I could show you.
Stupid Phone.
Alpha, Mike, Foxtrot....
No comments:
Post a Comment